A slightly blurred moon over Positano

If you have ever wondered why a tripod should be part of a photographers travel kit – here’s the reason.

Last night there was a fingernail moon over the bay as the last of the evening light faded. A perfect shot – but without a tripod it was a succession of ever so slightly blurred shots. No amount of ISO pushing or aperture opening could bring the shutter speed down to avoid camera movement.

The camera was braced, I was braced, but the result was always the same.

Note to self – next time pack the damn travel tripod.

Why shooting RAW is the best idea

For those photographers who are shooting using the jpeg format, here’s a pretty compelling demonstration of why you should change to a RAW format if you can.

Recently I took some car interior shots while the car was in being repainted. These were shots for my insurance company who, quite unreasonably I thought, wanted to have on file  some photos of the cars they insure.

Suffice it to say the shots were taken quickly with no real attention to detail.

With one shot the flash hadn’t fired and you can see the results below –  an interior that looks virtually black with no detail – but by tweaking the RAW file in Adobe Camera Raw the shot was made passable.

As a comparison I wondered how a jpeg of the same image would perform if tweaked the same way and the results were quite dramatically worse. I wasn’t expecting the quality gap to be so big.

The amount of detail contained in the shadows of the RAW file which can then be brought out is phenomenal.

So, if you can shoot in RAW but choose not too, think about a change.

An app worth grabbing – Prisma

Ever so often you run a cross an iOS app that is very cool. Prisma is one such app. It turns photos into art. Yes, I hear you say, there are lots of apps the do this – most produce a result that is absolute rubbish.

Prisma is different – it has a number of different styles you can choose from – and it’s free from the App Store.


Moon over Hataitai

F5.6, 1/160th sec, ISO400, Effective focal length 450mm


Tonight was close to a full moon, and as it rose over the horizon and cleared a bank of clouds I managed to capture this shot.

I’ve tried to get a shot like this many times before but I usually end up with a white blob on a black background. This time the fact it was only just dark and that the moon was magnified because it was close to the horizon all helped.

But this shot was still not what I’d seen through the viewfinder. Given the fact I was hand holding the camera and shooting at 160th of a second to minimise camera shake any detail outside of the moon was lost.

So with a little assistance from my favourite image editor, I’ve put together a view more in keeping with what I saw.

San Gimignano – quintessentially Toscana


San GimignanoWhen we were living in Tuscany having visitors arrive was always a treat. The opportunity to show people around “our neck of the woods” was always something we looked forward too. And as an experience of the essential Tuscany, San Gimignano was always a winner.

You may have heard of this village and it’s many towers. Originally it is said that there were up to 40 towers but now only 7 or 8 remain. But even with only a few towers it is still one of the most recognisable villages in the region.

Initially we thought that San Gimignano might be “too touristy” for our friends, but everyone we took there loved it. The walk up the hill from the Porta San Giovanni to the Piazza della Cisterna was always a great introduction, with the multitude of small shops that line the street adding to the feeling that this was the quintessential hilltop village. A drink or lunch in the main piazza was a must with a leisurely stroll down to the Porta San Matteo to follow.

We always seemed to leave with something – linen for the table or fresh pasta or a simple gelato from the award winning store Gelateria di Piazza located in Piazza della Cisterna.


Night and day

Over the last few days I’ve spent a bit of time playing around with Photoshop turning day shots to night shots. It’s one of those things that sounds hard but is relatively simple.

The key is to making things look realistic is to work out where the night light is coming from – street lights or the moon or an open window – and to work from that.

See what you think.


A comparison that surprised me

Two camerasMy first ever digital camera was a Canon Digital IXUS V. It boasted a 2.1 megapixel sensor, an optical view finder and a LCD screen on the back that was about the size of a postage stamp. Overall it was about as big as a packet of cigarettes and built like a brick.

I purchased it over 10 years ago and it has sat in a draw, unused, for the last few years because the battery has refused to charge. I ran across it a few weeks ago and decided to see if I could track down a new battery to bring it back to life. Surprisingly I managed to find a new battery  – thank you dc-battery.co.nz – and the camera came alive.

A comparison seemed to be in order – my rejuvenated Canon versus the Leica D-Lux 6 purchased in Hong Kong last year.

This is in no way a scientific comparison, just me playing around one afternoon at my desk. I was expecting the Leica to blitz the Canon – which it did – but in good light the antique Canon held up reasonably well – much better than I expected.

Of dogs and moon rises

Presenting two photos that you can only take when you’ve got the time. And that’s the great thing about holidays, you have the time.

The dog shot involved two tired girls and Jean acting as a wrangler behind me. It took about 30 shots to get the one I was looking for with Poppie staring down the lens and Bella on guard.

The moon rising over Nelson shot took time because I had no tripod and the shutter speed had to be quick enough to ensure a sharp shot but still have a reasonable depth of field. In the end I pushed the ISO to 800 and managed to hand-hold the camera steady for 1/30th of a second exposure. Then it was into Photoshop for some cropping, colour balancing and exposure work.

It’s great to have time for all this faffing about.

Colourising old photos

I’ve been playing around with colourising old black and white photographs using Photoshop. The technique is quite simple – if a little time consuming – and makes use of various blend modes to overlay colour on black and white while retaining the detail of the photograph.

Rather than trying to mimic a colour photo, the technique replicates the days when colour photos were simply black and white prints that had been hand coloured. Part of the fun is selecting the colours for clothes, backgrounds and the like. There is no reference colours so it’s all up to the imagination.

Below are a few examples of what can be done – using shots of various members of the family – well mainly me from many years ago.


A post with something for everyone

Bella with Pop in backgroundIt’s not often a single post can appeal to a range of different interests – but this one really hits the mark. It’s a picture of the dogs in our front yard but it offers so much more.

For dogs lovers it’s Bella taking some time out from patrolling the front gate with Poppie still on guard in the background. She’s wondering why I’m lying full length on the grass – hence the quizzical look.

For gardeners it’s a study in lawns – check out that lush green growth clipped to perfection and standing to attention – defying a hot and dry Wellington summer’s afternoon which is arguably one of the best summers anyone can remember.

For photographers the shot was achieved with the camera flat on the grass and was one of about 30 shots taken as the girls wandered around.

The camera used was my Nikon D7000 with a Nikkor 18 – 70mm zoom lens set to 50mm, the aperture at F9 to keep Bella in focus and to throw Poppie slightly out of focus, and the  shutter speed at 125th of a second to freeze any rapid movement. In Photoshop I replaced the original image of Poppie with one from another shot so she was looking up, cropped the shot using the rule of thirds (Bella’s head is about 1/3 of the way down the shot and 1/3 of the way in from the right), removed the distracting bright round hole in the gate, sharpened around Bella’s face and generally corrected the colour. Simple.

I’ve included the original shot for comparison.


I’ve always wanted a Leica camera

LeicaI’ve been an SLR camera guy for as long as I can remember. Ever since I bought my first camera back and lens – a Ricoh KR10 with a 50mm lense – I’ve relied on the control and quality a good SLR provides. The downside of an SLR is the bulk of the camera and various lenses – my current camera bag weighs around 6kgs. There is nothing subtle about taking the camera out for the evening and nothing subtle about using it.

I’ve always wanted a compact camera that could go anywhere, which still took great pictures, and which gave me the ability to control things like depth of field and shutter speed.

I’ve also always wanted a Leica camera but have always been put off by the prices – particularly in New Zealand.

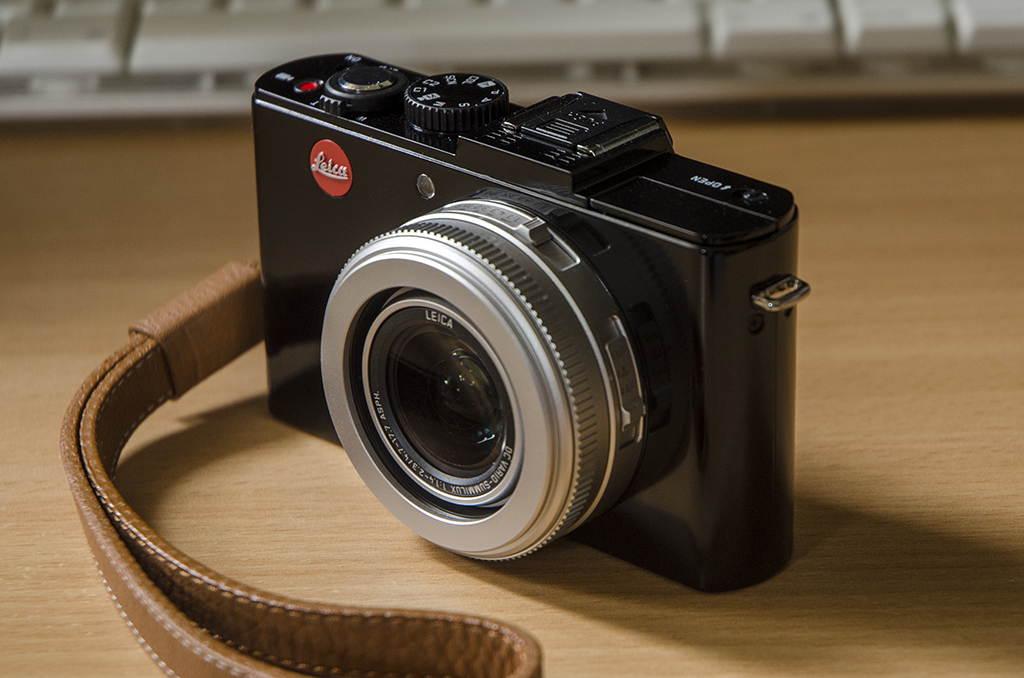
The opportunity to get both came my way when we stopped to browse at the Leica shop at Hong Kong airport. Leica’s range of compact cameras have always got good reviews and their latest mid range compact – the D-Lux 6 – has been no exception. And there sitting in the display cabinet was one calling my name.

Now the geeks among my readers will know that the D-Lux 6 is essentially the same camera as the Panasonic Lumix DMC-LX7. There are some minor cosmetic changes – like the addition of the round red Leica logo – but the cameras are one in the same. Leica have been working with Panasonic for years, using Panasonic’s hardware but then writing their own software to control image capture and processing.

This is where the two camera’s differ and the results are impressive. In fact it’s almost impossible to tell the difference between a shot taken on the Leica and a shot taken on my Nikon DSLR.

The Leica version of this camera carries a price premium but it seems worth it – for the added image quality as well as that small red circle on the front.

A post for geeks

Tech DisplayIn the old days the only technology we took on holiday was a still camera and maybe a video camera. These days that’s all changed and our bags are full of various bits of tech.

This trip we tried to minimise what we took but still ended up with a fair collection of things – as can be seen in the photo. The only piece of technology not shown is the camera I took this shot with – a Nikon D7000 with a 50mm 1.8 fixed lens.

Clockwise from top left – Sunpak PZ42X flash gun, Sigma 10-20mm wide angle lens, Nikon 18-70mm zoom Lens, Pebble smart watch, WD 500GB portable hard drive, Transcend multi card reader, MacBook Air – 11.6 inch, iPad, JBL Charge bluetooth portable speaker, 2 x iPhone 4S, TomTom GPS, Apple mouse, Sony T500 camera, Nikon 70-300mm zoom Lens and 3 iPad and iPhone chargers. Not included are all the cables that connect this stuff together and various charges for camera batteries.

Nothing like travelling light I say.